

Description
Choosing Features for Your Spin Bike
Determining which features are important to you is key to choosing the best bike for your Peloton experience. Given you’re spending a lot of money on your new spin bike, you want to make sure the riding experience is comfortable. These are the keys to comfort:
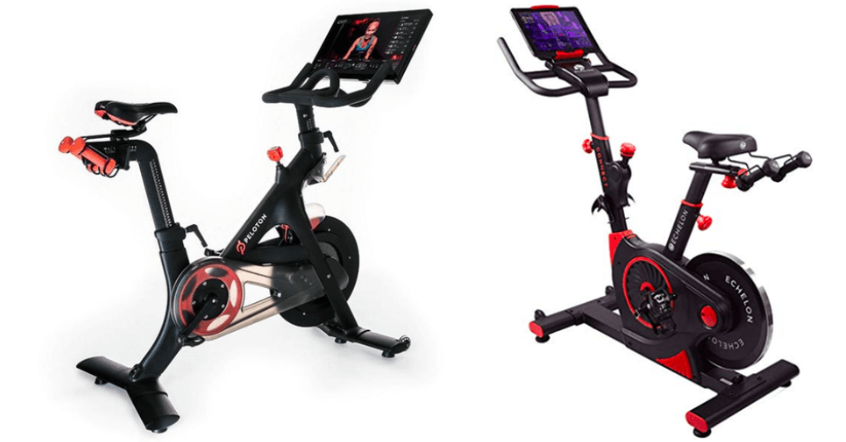
Adjustable Seat and Handlebars
Just like a road or mountain bike, adjusting the bike to fit your body is important for a comfortable and pain free ride. Most spin bikes offer two-way adjustability of the handlebars and seat, meaning adjusting up and down. Keep in mind that most spin bikes are designed for male riders or taller females, so if you don’t fit into those categories you’ll want to consider four-way adjustability. This will allow for adjusting the seat and/or handlebars back and forth. I’m on the shorter side, so four-way adjustability was key for me. I’m so glad I chose this feature because my seat and handlebars are both at the closest position available.
Handlebars & Pedals
One thing that boggles my mind about spin bike handlebars is the odd designs. Many of them don’t in any way resemble the handlebars used on traditional spin bikes or outdoor bikes. For this reason, make sure you look at the handlebar design of the spin bikes you’re considering to assess whether they look comfortable and allow for placing your hands in your preferred positions. These are the common hand positions used in spin classes.
As for pedals, at a minimum, you’ll want pedals with toe cages. Finding a bike with these won’t be a problem. If you prefer to clip in to the pedals, as you would with a road or mountain bike, you’ll probably need to buy those pedals separately from the bike. If you’re new to clip in pedals, keep in mind you’ll need to buy compatible shoes and cleats for the shoes. Best to consult a bike shop if you’re not sure what to buy. I suggest starting with the toe cages and upgrade the pedals later, if desired.
Accessories
Creating the Peloton experience with your new spin bike requires a few accessories, and the good news is that anything that doesn’t come with the bike you purchase can easily be purchased separately and added to your bike. The important accessories to look for (or purchase separately) are holders for a tablet, phone and water bottle. I suggest making a built-in tablet holder a priority. There’s one more optional (but highly recommended) accessory that I discuss in the Using the Peloton App section below.
My Choices: Four-way adjustable seat and handlebars; Toe cage pedals; Built-in tablet holder; Separate purchase of phone and water bottle holders from Amazon.
Where To Buy and Brand To Choose
Spin bikes are available in many places- both online and in sporting goods stores. In-store shopping is helpful for assessing the quality of the product you’re buying. Just keep in mind that home delivery might not be an option, and most bikes are upwards of 90 pounds.
When it comes to online shopping, you’ll want a store you can trust and that offers delivery. The problem you might run into with online shopping is the shear volume of spin bikes available for sale. That’s why it’s super helpful to have already decided on the options I listed above before you start shopping. That exercise is extremely helpful in narrowing down search results.
I chose online shopping, and by reading lots of reviews, it became pretty clear that there weren’t major differences between the brands of spin bikes in my price range. Almost all of them received favorable reviews, so I focused my buying choice on the spin bikes that fit offered my must-haves (magnetic resistance, $400 or less, 4-way adjustability, tablet holder).
Warranty and Assembly of Your Spin Bike
Before hitting the Buy Now button, I had to decide if I wanted the warranty that was offered and if I wanted to hire someone to assemble it. The warranty really comes into play when you buy a “connected” or “smart” bike that has an integrated tablet and can send cadence, resistance and power output to the tablet/app. My bike didn’t have those so I didn’t buy the warranty.
As for assembly, if purchasing through Amazon, you’ll likely have the option to purchase an assembled spin bike at added cost. For most people, I don’t think this is worth it. My spin bike was one of the easier things I’ve assembled, despite not being mechanically inclined. The directions were so poorly written that I barely used them. Given the size, there really wasn’t a lot to assemble. The core of the bike came assembled, so I just had to add the base, seat, pedals and handlebars. I believe most spin bikes are the same way.
Using the Peloton App
It’s time to put this all together and hop on your bike!! Let’s take a look at the final pieces you need in order to have the Peloton experience for a fraction of the purchase price of a Peloton spin bike.
Tablet and App
I recommend purchasing a tablet for using the app. Any tablet will do, so you don’t have to spend a few hundred dollars on an iPad. I only spent $60 for a basic 10 inch Android tablet. I only use the tablet for the Peloton app, so I didn’t need lots of storage or memory. Download the app from the Android or Apple store, create an account, and you’re ready to explore the live and on-demand rides from Peloton. You’ll also have access to the library of strength, yoga, meditation and running classes.
Cadence Sensor
Cadence is how fast you’re moving your legs. The Peloton instructors tell you the cadence you should be at throughout the workouts. Instead of guessing, it’s much easier and makes for a better workout if you have a cadence sensor. You can purchase the Wahoo cadence sensor from Amazon for about $40. Using the adhesive pad it comes with, stick it horizontally on the inside of one of the crank arms (attached to the pedal). Then download the Wahoo app to your phone. The cadence sensor connects via Bluetooth to your phone, and the app provides a reading of the cadence.
Additional Accessories
I touched on a few key accessories earlier. You’ll want a tablet holder and a phone holder. I bought a bike with a tablet holder and then purchased a phone holder/mount that attaches to the end of the handlebars. It’s a perfect setup that allows me to follow the instructor on the tablet and monitor my cadence on my phone.
A water bottle and cage are key for spin rides. You’ll definitely need water during your ride. Again, my bike didn’t come with a water bottle cage, so I purchased one from Amazon to attach to the frame. I recommend using a small-ish water bottle, 16-18 ounces. A 22 ounce or more seems a little too big to easily take out of the cage while riding.
One thing I haven’t purchased yet is a rack for light weights. Many rides don’t incorporate weights, so you won’t be limiting yourself if you don’t have weights. If you want the full experience, you can buy a weight rack that attaches to the back of your saddle and holds two dumbbells.
The last item to add to your new spin bike is a mat to protect your floor. Whether the spin bike is on a hard surface or a carpet, you’ll want a heavy duty mat underneath.